Resizing an image sounds simple: change the width, change the height, click download. Then you open the result and somehow a perfectly sharp photo has developed the visual confidence of a security-camera screenshot from 2004.
The problem usually isn't resizing itself. It is how far you're resizing, whether the aspect ratio is preserved, and how the software calculates the new pixels.
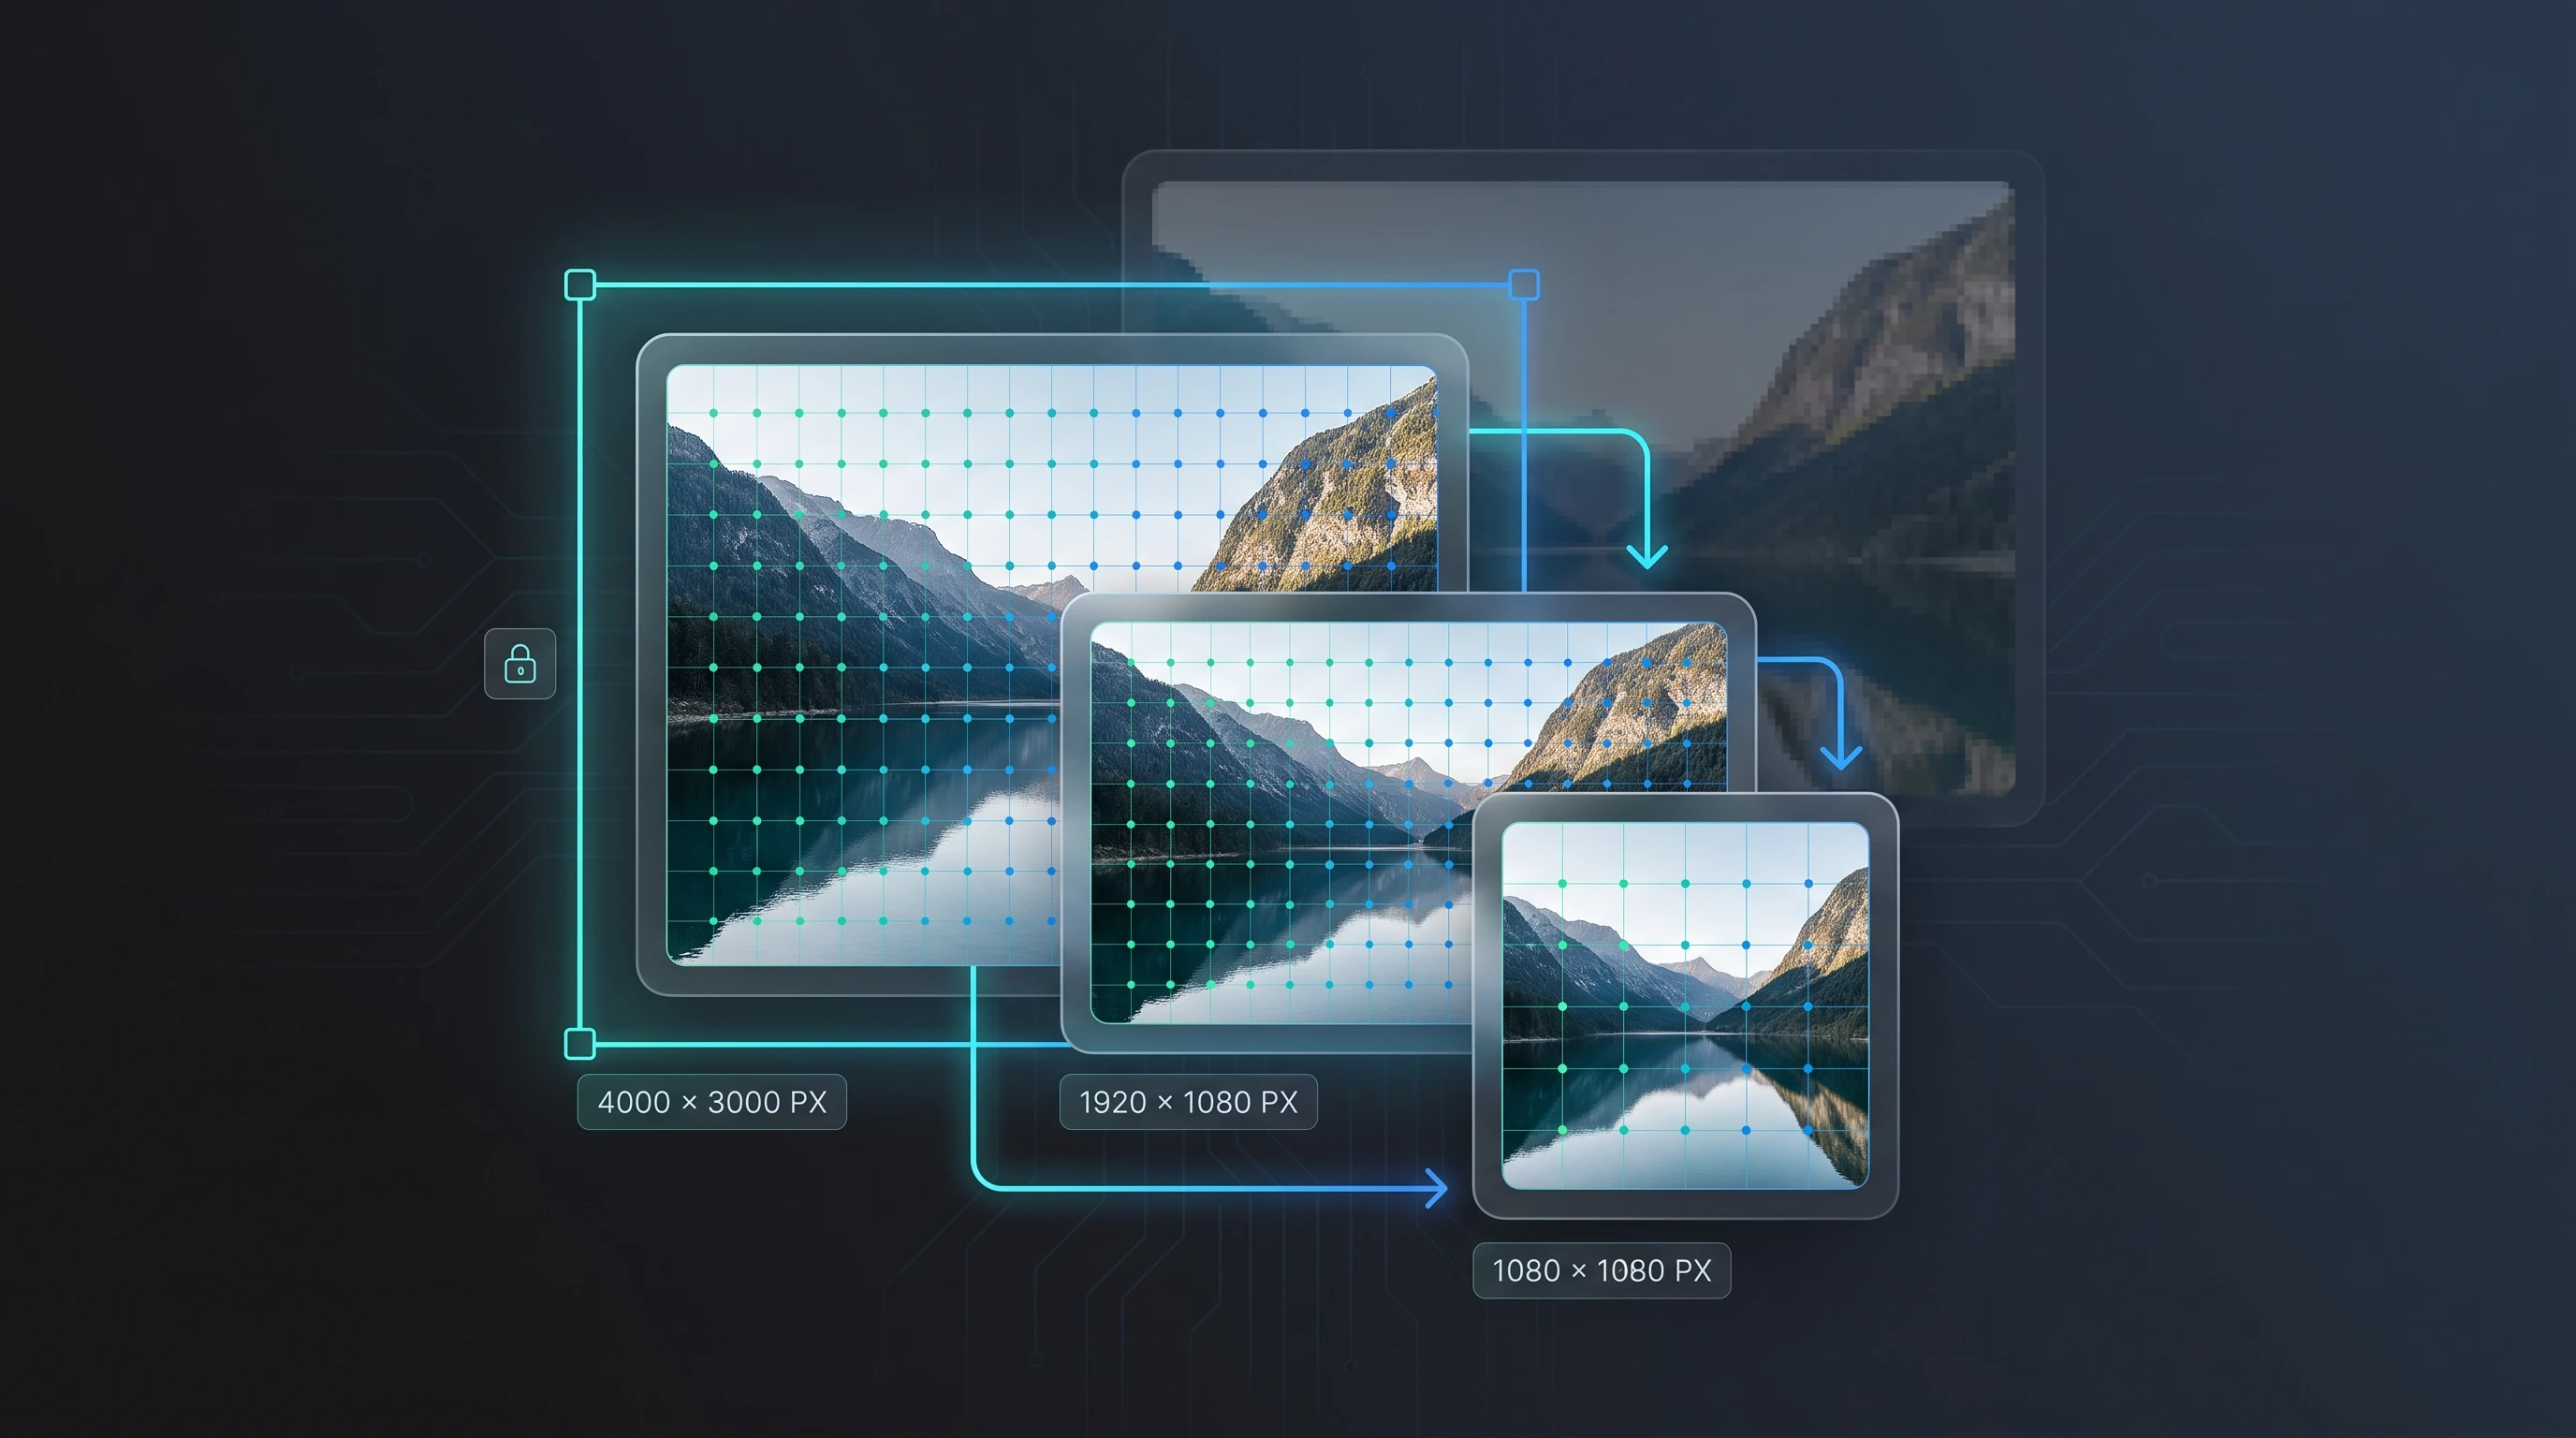
If you want to resize an image in pixels without losing quality, the most important thing to understand is that making an image smaller and making it larger are two very different operations. One throws away information carefully. The other has to invent information that was never there.
What actually happens when you resize an image?
A raster image — such as JPEG, PNG, or WebP — is a grid of pixels.
A photo that is 4000 × 3000 pixels contains:
4000 × 3000 = 12,000,000 pixels
or 12 megapixels.
Change that image to 2000 × 1500 and the new version contains only 3 million pixels. The resizer has to combine information from the original pixels to create a smaller grid.
That process is called downsampling.
Go in the opposite direction — say from 1000 × 750 to 4000 × 3000 — and the software suddenly needs 12 million pixels even though the original contains only 750,000.
Those extra pixels have to come from somewhere.
Unfortunately, there is no hidden drawer full of spare detail inside a JPEG. The resizer estimates what the missing pixels should look like based on the pixels around them. That is upsampling.
This difference explains most of the mystery around image resizing.
Downsampling vs. upsampling: why shrinking usually looks better
When you reduce an image, the software has more source information than it needs.
Imagine shrinking a 4 × 4 patch of pixels into a 2 × 2 patch. The resizer can examine groups of original pixels and calculate representative values for the smaller image.
Some fine detail disappears because there are fewer pixels available to display it, but a good resizing algorithm can preserve edges, colors, and overall sharpness surprisingly well.
That is why resizing a 4000px-wide camera photo down to 1200px for a website normally looks clean.
Upscaling works differently.
If you enlarge a 500 × 500 image to 1000 × 1000, the width doubles and the height doubles — but the total pixel count becomes four times larger:
| Dimensions | Total pixels |
|---|---|
| 500 × 500 | 250,000 |
| 1000 × 1000 | 1,000,000 |
| 2000 × 2000 | 4,000,000 |
The original image simply does not contain enough real information for all those new pixels.
The software therefore estimates them using interpolation. A good algorithm can make the enlargement look smoother, but it cannot recover eyelashes, fabric texture, tiny lettering, or other detail that never existed in the source.
That is the key to understanding how to resize a photo without pixelation:
Shrinking can preserve existing detail. Enlarging cannot magically create missing detail.
AI upscaling can sometimes reconstruct plausible-looking detail, but that is a different process from ordinary image resizing — and "plausible" is doing some work in that sentence.
Why images become blurry, jagged, or pixelated
Poor resizing tends to produce one of three problems.
Pixelation happens when an image is enlarged enough that individual source pixels become noticeable. Small images are especially vulnerable.
Blur occurs when interpolation smooths the boundaries between pixels too aggressively. Instead of visible blocks, you get soft edges and lost detail.
Jagged edges can appear when diagonal lines, curves, text, or high-contrast boundaries are resampled poorly.
The severity depends on:
- the original image resolution
- the target dimensions
- how much you enlarge or shrink it
- the interpolation algorithm
- whether you resize repeatedly
- whether the result is also heavily compressed afterward
A high-resolution original gives an image resizer much more information to work with, which is why starting from the best available source matters so much.
If possible, don't resize a 700px copy of a photo when the original 4000px version is sitting three folders away pretending it doesn't exist.
The aspect ratio checkbox is more important than it looks
An image's aspect ratio is the relationship between its width and height.
For example:
- 1200 × 800 = 3:2
- 1920 × 1080 = 16:9
- 1080 × 1080 = 1:1
- 1080 × 1350 = 4:5
Suppose your original image is 1200 × 800.
If you change its width to 600 pixels while maintaining the same proportions, its height should become 400 pixels.
The calculation is:
new height = original height × (new width ÷ original width)
So:
800 × (600 ÷ 1200) = 400
Simple enough.
But if you manually enter 600 × 600, you've changed a 3:2 rectangular photograph into a 1:1 square without cropping anything.
Something has to give.
Usually that "something" is everyone's face.
The image gets squeezed horizontally or stretched vertically because the pixels are being forced into proportions they were never designed for.
That is why an image resizer maintain aspect ratio option — usually shown as a lock icon or checkbox — should stay enabled for normal resizing.
With the ratio locked, changing the width automatically calculates the correct height, and changing the height calculates the matching width.
Maintain aspect ratio vs. crop: they solve different problems
Locking the aspect ratio does not mean you can never create a different-shaped image.
It simply means resizing alone should not distort the picture.
If you have a 3:2 photograph and need a square Instagram graphic, the correct workflow is usually:
- Crop the image to a 1:1 composition.
- Resize that square crop to the required pixel dimensions.
Do not squeeze a rectangle into a square and hope nobody notices.
For web editors, the same principle applies when fitting an image into a fixed design container. You either preserve the image and allow empty space, or preserve the ratio and crop part of the image. Stretching should be the last option unless the creative direction specifically calls for "funhouse mirror."
Bilinear, Bicubic, and Lanczos interpolation in plain English
Interpolation is the method a resizer uses to calculate pixel values when the pixel grid changes.
There are many algorithms, but three names appear frequently in editing software and image-processing libraries.
Bilinear interpolation
Bilinear interpolation looks at nearby pixels and blends their values to estimate the new pixel.
It is relatively fast and produces smoother results than simply copying the nearest pixel, but that smoothing can make resized photographs appear slightly soft.
Good for: quick previews, moderate resizing, situations where speed matters more than maximum sharpness.
Weakness: fine details and crisp edges can become softer.
Bicubic interpolation
Bicubic interpolation considers a larger neighborhood of surrounding pixels and uses a more complex calculation to estimate the output.
In practice, it usually preserves gradients and edges better than Bilinear while avoiding extremely harsh results.
Good for: photographs, general-purpose resizing, moderate enlargement or reduction.
Weakness: slower than Bilinear and still cannot restore detail missing from a low-resolution source.
For most ordinary photo resizing, Bicubic is a very reasonable middle ground.
Lanczos interpolation
Lanczos uses a higher-quality resampling filter designed to retain fine detail and sharp transitions.
It is especially useful when reducing high-resolution images because it can preserve detail very well during downsampling.
Good for: high-quality resizing, photographs, web assets, and substantial reductions where sharpness matters.
Weakness: it requires more computation and can occasionally create subtle ringing around very sharp high-contrast edges.
In general image-processing education, Bicubic and Lanczos are common interpolation choices when visual quality matters. AI Genzox does not expose an interpolation selector; its current workspace lets you control dimensions, aspect ratio, output format, and quality.
A simple way to think about the three:
| Method | Speed | Sharpness | Best use |
|---|---|---|---|
| Bilinear | Fast | Moderate | Quick/simple scaling |
| Bicubic | Medium | High | General photography |
| Lanczos | Slower | Very high | Quality-focused resizing and downsampling |
The important caveat is that no interpolation method makes extreme enlargement lossless. A better algorithm can hide the damage more gracefully; it cannot repeal mathematics.
Pixel dimensions vs. percentage scaling
Many tools let you resize using either exact pixel dimensions or a percentage.
Both are useful, but for different jobs.
Use pixel dimensions when the destination has a requirement
Choose pixels when you already know exactly what the output needs to be.
Examples:
- website thumbnail: 600 × 400px
- blog hero image: 1200 × 630px
- square social graphic: 1080 × 1080px
- portrait social post: 1080 × 1350px
- custom CMS requirement: 800px wide
If someone tells you to resize resolution of image assets to a particular width, pixels remove the guesswork.
This is also where an image resizer pixels interface is much more useful than dragging handles around visually. You know what went in, what came out, and nobody has to inspect the file afterward with a ruler.
Use percentage scaling when the exact size doesn't matter
Percentage scaling is useful when your goal is simply "make this smaller."
For example:
- 50% turns 4000 × 3000 into 2000 × 1500
- 25% turns 4000 × 3000 into 1000 × 750
Because both dimensions scale by the same percentage, the aspect ratio stays intact.
Percentage scaling is convenient for quick reductions, but pixels are better when you're preparing an asset for a website, app, marketplace, or social platform with defined dimensions.
Step by step: resizing an image with AI Genzox
The Image Resizer lets you resize the image using exact pixel dimensions while keeping the original proportions under control.
- Upload your image. Drag the file into the tool or click to browse. Start with the highest-resolution original you have whenever possible.
- Enter your target width or height. Use exact pixels when you're working toward a website, social media, or CMS specification.
- Keep the aspect ratio locked. With the proportions linked, changing one dimension automatically keeps the other dimension correct. Disable it only when you deliberately need independent width and height values.
- Choose your output settings and check the result. Inspect important details such as text, eyes, fine edges, logos, and high-contrast areas before downloading.
- Download the resized image. Your original file remains unchanged, so you can create another size from the same source instead of resizing an already-resized copy.
If the resized image also needs a smaller file size, use the Image Compressor afterward. Resizing changes the number of pixels; compression changes how efficiently those pixels are stored. They solve related problems, but they are not the same thing.
If you need a different format as well, the Image Converter can switch the result between supported formats.
New to AI Genzox? The getting started guide covers the platform and its tools in one place.
How to resize an image for Instagram without making it blurry
Social platforms are one of the most common reasons people search for an image resizer for Instagram.
As of 2026, commonly recommended Instagram dimensions include:
| Instagram use | Recommended size |
|---|---|
| Square feed post | 1080 × 1080px |
| Portrait feed post | 1080 × 1350px |
| Landscape feed post | 1080 × 566px |
| Story | 1080 × 1920px |
| Reel | 1080 × 1920px |
The best workflow for how to resize an image for Instagram is to start with an original that is at least as large as your intended output, crop it to the correct aspect ratio if necessary, and only then resize it to the final pixel dimensions.
For example, if you have a 4000 × 3000 landscape photo and want a 1080 × 1350 portrait post, simply typing those dimensions would distort the photo because the ratios are different.
Instead:
- Crop the composition to 4:5.
- Resize that crop to 1080 × 1350px.
- Check important details before export.
This gives the resizer the right shape before it reduces the pixel count.
Social platforms may change their layouts and recommendations over time, so check the latest platform requirements before preparing an entire month's worth of content. Discovering a dimension change after exporting 73 campaign graphics is character-building, but there are easier ways to build character.
What about an image resizer for Windows?
If you are searching for an image resizer for Windows, the same principles apply whether you use a desktop application or an online resize image tool.
The operating system is not what determines whether the result stays sharp. The important factors are still:
- original resolution
- target resolution
- aspect ratio
- interpolation quality
- output compression
An online photo image resizer can produce a result suitable for web publishing when it uses a sound resizing process and you choose sensible dimensions. AI Genzox temporarily uploads the source to our servers for this operation; it is not processed locally in your browser.
The bigger advantage of using exact pixel controls is consistency. If every blog thumbnail needs to be 1200 × 630, you can enter 1200 × 630 instead of manually eyeballing the size each time.
Your eyes are excellent at appreciating a photograph. They are significantly less reliable at determining whether it is exactly 1200 pixels wide.
Can resizing an image make the file smaller?
Yes — often dramatically.
Reducing pixel dimensions means the file contains less image data.
A 6000 × 4000 photo contains 24 million pixels. Resize it to 1500 × 1000 and the result contains only 1.5 million.
That reduction usually lowers file size even before additional compression.
But pixel dimensions and file size are not interchangeable.
This matters if you're trying to resize image to 20kb.
There is no universal pixel dimension that guarantees a 20KB file because final size also depends on:
- image format
- JPEG/WebP quality setting
- amount of visual detail
- transparency
- metadata
- encoder settings
A simple illustration with a flat background might fit under 20KB at surprisingly large dimensions. A detailed photograph of grass, hair, confetti, or tree branches may need much more compression or much smaller dimensions.
So if you need a 20KB result, the practical workflow is:
- Resize to the dimensions you actually need.
- Compress the resized file.
- Check the resulting file size.
- Reduce quality or dimensions slightly if it is still above the target.
Trying to solve a strict file-size requirement using dimensions alone is like trying to make luggage weigh exactly 20kg by measuring the suitcase. Related? Yes. Same measurement? Not quite.
How far can you enlarge an image before quality drops?
There is no single safe percentage because images contain different amounts of detail.
A clean illustration, icon, or simple graphic may tolerate enlargement better than a heavily textured photograph. Text and thin lines can expose scaling problems very quickly.
As a rule, if sharpness matters, avoid enlarging raster images beyond their original dimensions unless you have no better source.
Small enlargement — for example 110% or 120% — may look acceptable depending on the image and interpolation method.
At 200%, 300%, or 400%, you are asking the software to create substantially more pixels than the source contains. At that point softness or artificial-looking detail becomes increasingly difficult to avoid.
If you need a genuinely large version for printing, signage, or high-resolution design work, finding the original file is usually better than endlessly stretching the small version.
Common image resizing mistakes
Typing a new width and height with aspect ratio unlocked. This is the fastest route to stretched faces, oval logos, and circles that have quietly become eggs. Keep the ratio locked unless distortion is intentional.
Upscaling a tiny source and expecting original-quality detail. Interpolation can smooth missing pixels, not recover information that was never captured.
Resizing the resized version again. Keep the highest-quality original and generate every required size from that source. Repeated transformations and exports can gradually reduce quality.
Confusing dimensions with file size. A 1080 × 1080 image is not guaranteed to be 50KB, 100KB, or any other specific storage size. Resize for dimensions; compress for file weight.
Using the wrong dimensions for the destination. If a platform wants a particular ratio, crop to that ratio first. Do not force the image into incompatible width and height values.
Assuming sharper always means better. Excessive sharpening after resizing can create halos around text, faces, branches, and high-contrast edges. Natural sharpness usually beats the crunchy "every pore has its own postcode" look.
Starting from a thumbnail. If the full-size original exists, use it. Your image resize free workflow cannot preserve detail that disappeared before the image ever reached the resizer.
How to resize images without losing quality: the practical rule
If you remember only one workflow, use this:
Start large → preserve the aspect ratio → crop when the shape must change → resize once to the final dimensions → inspect the result → compress afterward if necessary.
That covers most quality problems people encounter when they search how to resize images, resize this image, or simply want to resize the image for a website without turning sharp artwork into mush.
You cannot make every resize mathematically lossless because changing a raster image's pixel grid necessarily changes the data.
But you can make the change visually lossless for normal viewing — particularly when reducing a good-quality source with a high-quality interpolation method.
That is the realistic goal.
A practical checklist
Before downloading a resized image, check these five things:
- Am I starting from the highest-resolution original available?
- Is the aspect ratio locked so the image cannot stretch or squash accidentally?
- Am I resizing down where possible instead of heavily enlarging a small source?
- Do my pixel dimensions match the website, Instagram post, CMS, or other final destination?
- If I need a specific file size such as 20KB, am I treating compression separately from pixel dimensions?
If all five are yes, your image has the best chance of staying sharp, proportional, and clean after resizing — which is exactly what a good image resizer without losing quality should help you achieve.